
 Spatchcocking a turkey is one of those kitchen tricks that sounds fancy but is surprisingly straightforward. This process helps your bird cook more evenly, gives you the crispiest skin, and gets dinner on the table faster, which is pretty handy during the holidays or whenever you’re in the mood for a turkey feast.
If you’ve ever struggled with dry breast meat or unevenly cooked turkey legs, spatchcocking can help fix those issues. It lets you flatten out the entire bird, so you’re not waiting for thick parts to finish cooking while thinner pieces dry out. Once you get the hang of it, you’ll probably wonder why you ever roasted a whole turkey any other way.
This guide walks you through everything you need to know about spatchcocking a turkey, including benefits, step-by-step instructions, tools, prep tips, and roasting advice. Whether you’re a first-timer or just looking for a refresher, I’m covering it all, with plenty of simple explanations and a few tips I’ve picked up from personal kitchen experiments over the years.
Why Spatchcock a Turkey?
Spatchcocking, also called butterflying, means removing the backbone from the turkey and flattening the bird before roasting. It’s a classic technique for chicken, but it works just as well for larger birds like turkey. Here’s why this method is worth trying:
- Even Cooking: Because the bird is flat, the breast and leg meat cook at the same rate. No more dry breasts or undercooked thighs.
- Shorter Roast Time: A spatchcocked turkey usually cooks 30 to 50% faster than a whole bird.
- Crispy Skin: The entire surface, including the legs and thighs, is exposed to the heat. This means maximum crispy, golden-brown turkey skin.
- Easier Carving: The flat shape makes slicing and serving much less of a hassle.
- Better for Gravy: Roasting the turkey flat gives you deeply browned pan drippings for delicious, flavorful gravy.
If you’re after juicy, evenly cooked turkey with less stress on the big day, spatchcocking is absolutely worth considering. Plus, it makes you look like a pro to anyone watching you prep the holiday meal.
Tools and Prep: What You Need Before You Start
Before you jump into spatchcocking, having the right tools makes things easy and safer:
- Sharp Kitchen Shears or Poultry Scissors: A sturdy pair is essential for cutting through the turkey’s backbone.
- Large Cutting Board: A big, stable surface helps when handling a large raw bird.
- Boning Knife or Chef’s Knife: Sometimes you need a knife to help with tricky spots.
- Paper Towels: Drying the skin before roasting gives you crispy results and a slipfree grip while cutting.
- Roasting Pan with Rack (optional): Some people roast directly on a sheet pan, but a rack lifts the bird and lets hot air circulate for super crispy skin.
- Disposable Gloves (optional): If you don’t like handling raw poultry directly, gloves are handy.
If you’re working with a frozen turkey, make sure it’s completely thawed. For food safety tips on thawing poultry, check the USDA’s recommendations here. Starting with a thawed bird smooths the way for a cleaner cut and better seasoning, so plan ahead by reviewing proper thawing times based on your turkey’s weight.
Step-by-Step: How to Spatchcock a Turkey
I’ve broken down the spatchcocking process into easy-to-follow steps. It’s a little messy but not difficult, and after doing it once, you’ll breeze through it like a pro. If your kitchen is tight on space, consider clearing off your counters ahead of time for extra elbow room.
1. Clear Your Workspace
Start with a clean cutting board and gather your tools. It’s a smart move to have some paper towels close by for wiping up any juices as you go. Remove any packaging and extras from the turkey cavity, like the neck and giblets. You can save these for broth or gravy if you like.
2. Position the Turkey
Place the turkey breast side down with the back facing up. The legs should be pointed toward you and the wings at the top. Take a minute to pat the bird dry. Raw turkey is slippery, so this helps with gripping and safety.
3. Remove the Backbone
Starting on one side of the backbone, use your kitchen shears to cut down the length of the bird from tail to neck. You’ll hear crunching as you go through the ribs. Repeat this on the other side to completely remove the backbone. It takes a bit of strength, especially with a large turkey, but stay close to the bone for easier cutting. Set the backbone aside for stock or discard it if you don’t intend to use it.
4. Open the Bird
Carefully open up the turkey like a book. Sometimes you’ll hit a bit of resistance. Use your knife to help cut through any tough spots, especially around the wishbone area. Flip the bird over so the breast side is facing up, and spread the legs and wings out.
5. Flatten the Breastbone
To get your turkey perfectly flat, press down on the breastbone with both hands. You’ll probably hear a pop as the bone cracks and the bird flattens. This step is oddly satisfying! If you have trouble, you can score the bone with your knife from the inside to make it a bit easier to break.
6. Trim Excess Fat or Skin
Take a look at your turkey and trim any extra fat or scraps of skin around the neck, tail, or cavity to help with even browning and prevent burning. Don’t toss those trimmings—add them to your stock pile for more flavor later on.
7. Prepare for Roasting
Your turkey is ready to season and roast. Pat the skin dry one more time, then move the spatchcocked bird to your roasting pan or a rimmed baking sheet with a rack. Letting the bird sit uncovered in the fridge for an hour or more can give a boost to skin crisping later during roasting.
How to Season a Spatchcocked Turkey
With the turkey laid out flat, you’ll find seasoning is much easier—no awkward angles. Here are some of my top tips for great flavor:
- Salt Early: For extra juicy, flavorful meat, salt your turkey the night before. Use 1 to 2 teaspoons of kosher salt per pound and let it rest, uncovered, in the fridge overnight. This dry brine helps crisp up the skin and season the bird inside and out.
- Butter or Oil: Brush the skin with melted butter or oil. This helps seasoning stick and gives your turkey that eye-catching, golden color.
- Herbs and Spices: Classic options like rosemary, sage, and thyme work great. Add black pepper, garlic powder, smoked paprika, or lemon zest for extra zing. Mix chopped herbs right into your butter for a flavor boost beneath the skin.
- Aromatics: Tuck fresh herbs, halved lemons, or garlic cloves under the bird and around the pan for more aroma and a subtle boost to the pan juices.
If you’re new to dry brining, Serious Eats has a solid why-and-how guide here. You can also experiment with spice blends like Cajun or BBQ rubs to give your turkey a unique twist. Don’t forget a bit of olive oil or compound butter under the skin—this keeps the breast moist and flavorful.
Roasting a Spatchcocked Turkey: Tips & Timing
There’s no need to overthink the roasting process. Flattened birds are really forgiving and easy to handle. A few pointers make it even smoother and help you serve up a juicy, crispy-skinned bird every time:
- Temperature: Roast at 425°F (218°C) for a crispy skin and juicy meat. If your oven smokes or gets really hot, 400°F (204°C) works too. It just might take a little longer.
- Cooking Time: Most spatchcocked turkeys take about 6 to 10 minutes per pound. An average 12-pound turkey is usually done in about 70 to 90 minutes. Larger birds will need more time, but always check sooner than you’d expect. Spatchcocking really speeds things along!
- Check Temperature: Use a meat thermometer. The thickest part of the thigh should hit 165°F (74°C) and the breast 155 to 160°F (68 to 71°C). The bird keeps cooking as it rests, so don’t worry if it’s a few degrees under at first.
- Resting: Give your turkey at least 20 to 30 minutes to rest after coming out of the oven. This keeps juices inside the meat and makes for easier carving.
- Save the Pan Juices: All those delicious brown bits and juices are perfect for gravy. Tilt the pan to drain them and use as your gravy base, or deglaze the pan for even richer flavor.
If you’re nervous about timing, set an oven timer and check regularly once you hit the minimum roast time. Use a good instant-read thermometer, and don’t let the bird sit too long uncovered after roasting if you want to hold in all its moisture.
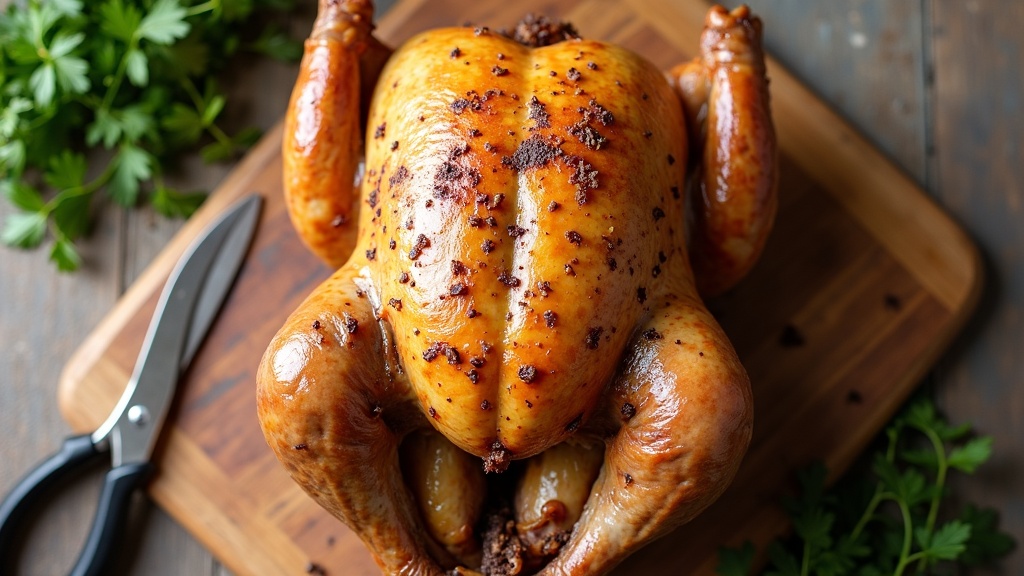
Carving and Serving Tips
Carving a spatchcocked turkey is much easier than dealing with a whole bird. The bones are exposed, and the turkey sits flat, making it way less awkward to handle. If you’ve ever struggled lifting a slippery, hot bird from its pan, spatchcocking is a real game changer.
- Start by removing the legs and thighs. Cut between the thigh and breast, then separate drumsticks from thighs at the joint.
- Slice off the wings at the joint for easy serving.
- For the breast, cut down alongside the breastbone to remove the whole breast half, then slice across the grain.
- Arrange everything on a platter and pour a little pan juice over each piece to keep things juicy and hot.
Fresh herbs or lemon slices make for a nice touch on the serving platter, but the star here is definitely that next-level cool, golden, crispy skin. For extra appeal, garnish with a handful of fresh parsley or thyme sprigs.
Troubleshooting: Common Spatchcocking Issues
The most common problems involve cutting through the backbone and getting the bird to lie flat. Here are some ways to work around those tricky moments:
- Can’t Cut the Backbone? Go slow, use sharp shears, and get as close to the bone as you can. For really big turkeys, cut from both ends to make it easier. A chef’s knife helps with stubborn joints and cutting through thick bones. If needed, give the bird a break, and come back with fresh hands for more leverage.
- Breastbone Won’t Crack? Use both hands to press down hard. If you need to, make a small notch in the bone with your knife to help it pop, or use the heel of your hand for even pressure.
- Bird Keeps Sliding Around? Put a damp paper towel under your cutting board or use singleuse gloves for a firmer grip. A textured board can also help prevent slipping.
- Turkey Seems Too Big? Spatchcocking works best for birds up to about 16 pounds, but you can still do it with larger turkeys. Cut the bird in half for easier handling, or ask your butcher about prespatchcocking. Remember, handling a huge turkey is always a little awkward, so team up if you need to.
If you find yourself struggling, take a breather and regroup. The process gets smoother with practice—and even the first time, the reward is totally worth the effort.
FAQs: Quick Answers About Spatchcocking
Can I spatchcock a turkey ahead of time?
Yes! You can prep your turkey up to two days early. Store it on a sheet pan in the fridge, uncovered, to dry out the skin and help with crisping.
What do I do with the backbone?
I like to toss it in a pot with the neck, onion, celery, and carrot for homemade stock. It’s perfect for gravy or soup. Add a bay leaf and some peppercorns for an easy, super flavorful broth.
Does the cooking time really get shorter?
Absolutely. Flattening speeds up roasting. Just start checking the turkey 30 minutes sooner than for a traditional roast, especially if you’re using convection. Having a reliable thermometer helps you avoid overcooking and keeps things juicy.
Is spatchcocking messy?
There can be some splattering as you cut, so lay out extra paper towels. Clean up is pretty quick if you prep your area ahead of time. Disposable gloves can help keep things tidy, and remember to sanitize your kitchen after dealing with raw poultry.
Will spatchcocking affect my stuffing?
Since you can’t stuff the cavity of a spatchcocked bird, roast your stuffing separately in a dish. This method gives you more control over the texture and lets you crisp up the top.
Next Steps: Give It a Try
After trying spatchcocking, roasting turkey gets way easier and more predictable. Besides the flavor and crispy skin payoff, it’s just a lot of fun flattening out a bird and seeing how quickly everything cooks. Give spatchcocking a shot and see for yourself the difference it can make on busy family dinners—or just for a hands-on kitchen adventure.
Your Action Plan:
- Pick up a good pair of kitchen shears and give spatchcocking a test run on a chicken. It’s the same method, just on a smaller scale.
- If you’re ready for turkey, follow the steps above and set aside an hour or two for the first try. Remember, practice makes perfect, and soon you’ll breeze through without a hitch.
- Don’t be afraid to use bold seasonings or try out new flavors—spatchcocking makes seasoning super easy. Experiment with citrus, spicy rubs, or even a touch of honey for extra color on your finished turkey.
Once you’ve done it once, you’ll probably want to make it your goto method for turkey, whether it’s Thanksgiving, a family dinner, or just because. Got spatchcocking tips or questions? Feel free to share your own hacks in the comments! If you’re looking for more turkey ideas, check out recipes for smoked spatchcocked turkey, BBQ turkey, or herbcrusted turkey breast—options are endless now that you’ve got this skill under your belt.